

The trinket box is one of the unique production pieces at Aura that allows you to practice a number of skills. It includes throwing, slab work, scoring and cutting and also has plenty of opportunity to add your own touch to the design. This ceramic trinket box is not air tight hence it will make a great make up holder or a ceramic container to hold jewelry. The gorgeous colors of the glaze will compliment your home decor.
Let’s take a look at how these are created and some of the key steps that you need to think about. You can check out the video below to see the entire process. We love to see what fellow potters end up with while trying out one of our designs so do send us a picture or tag us when you post it online!
Step One: Throw a cylindrical pot on the wheel with straight walls and a wide base
The first thing you need to do (after wedging and preparing the clay, of course) is to throw a pot on the wheel. This should be a perfect cylinder with a consistent diameter from bottom to top. Make sure the walls are about 0.5 cm thick, and leave enough thickness at the base of the pot to be able to trim it to create a foot. The pot should be about 8 cm high. Trim the lip of the pot so that it has a flat surface (the lid of the box will be attached here later on)
Let the pot dry on the bat till it’s leather hard.
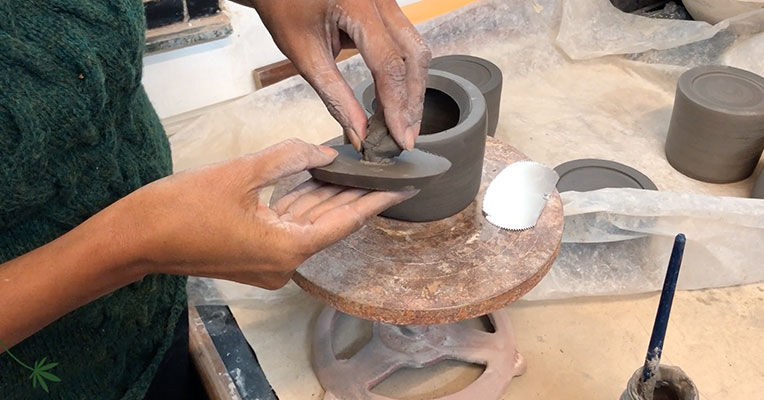
Step Two: Roll out a slab, cut out the lid and attach it to the pot.


While the pot is drying, roll out a slab of the same thickness as that of the walls of the pot. Once both the slab and the pot are leather hard, place the inverted pot on top of the slab and trace out the lid. Remove the pot, score the lip of the pot and the edges of the traced slab, add some slip and attach the two together, and cut out the excess slab.
You should now have a cylinder sealed from both ends. Make sure you neatly join the pieces together and smooth them out.
Step Three: Trimming

Once you’re pot has dried a bit more but still leather hard, place it inverted on the centre of the wheel, secure it with some clay and trim it to smooth out the walls and create the foot of the box.
Step Four: Making the Lid

This is where we break the symmetry! Carefully cut out a lid at the top of the box, keep your knife at a 45 degree angle so that the lower part of the opening in smaller than the top of it. This is what the lid will rest on, so if it’s completely straight, the lid will fall into the box and if the top is smaller than the bottom, then you won’t be able to take the lid out..
You can either make a perfect circle or an asymmetrical circular shape depending on how you’d like it, but don’t go overboard with the curves or it’ll be tough to use it.
Step Five: Attach the handle
Take the lid out and score the part where you want the lid to come. Take an odd piece of clay, and score the section you want to attach to the lid. Slip it together and you’re all done! (well almost)
Step Six: Finishing touches

Take a wet sponge and smoothen out the entire surface of the piece. You now have a ceramic box with a lid as a finished product. Cover it to dry slowly.
Do a bisque firing, have fun with some glazes and glaze firing.
That’s how we make our trinket boxes, you can see some of the finished ones we’ve got below. If you happen to try this, please share pictures! We love seeing our fellow potters have a go at it.


Like this tutorial? Don’t forget to pin it!
